It’s that September time of new beginnings, which has led to more new Pilates enquiries and a flurry of activity in the studio. So we’ve some new Induction classes to help introduce people to Pilates and teach the basics before they join a class. One of the key things that people always struggle with is the breathing. I know it seems back to front, it did to me too. However the breathing really is key. Let’s face it, breathing full stop is key.
The breathing in Pilates gives you stronger movements, more control and helps you focus. If Pilates was Star Wars I reckon the breathing would be “the light sabre” and the core would be “the Force”.
Why is it so important? When you breath in the right way you work with your core. So you will get a more effective movement, work harder and see better results.
Stress, everyday life and bad posture leads to people breathing into their belly or having their shoulders rise and fall as they breath. The type of breathing we are after in Pilates is thoracic breathing. This means breathing with the ribcage expanding and contracting.
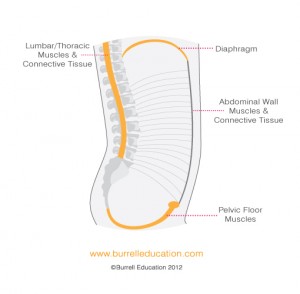
A good way to practise this is to tie a resistance band or folded towel around your ribcage. Alternatively place your palms with middle fingers touching, on your ribcage. As you inhale breath into the ribcage, you should feel it expand or push into the band with the breath. The diaphragm moves downwards. As you exhale let the breath come out of the ribcage, the diaphragm moves upwards and you will feel a tightening in your core (your lower abdominals will draw towards you and your pelvic floor will lift). You may have to exhale to the end of your breath to initially feel this. Once you tune into it, it will feel more intuitive.
Do you sit a lot for work/travel? It’s well known now that sitting for long periods really isn’t good for our bodies, however it isn’t always avoidable!
Sitting can often lead to tight hamstrings, rounded shoulders and lower back pain. Here are some ideas to help you release tension, alleviate pain and correct your posture.
Ask for someone to look at your chair and work station with you sat in it. Looking at whether your feet can go flat on the floor, how upright you are sat, the position of your laptop/computer in relation to your eyeline, arms and shoulders.
Think about what work you can do stood up. Can you make a standing workstation? For example, I often use our breakfast bar as a place to work as it’s the right height for me to work on my laptop.
Take regular posture breaks. Make sure you get up and walk around, change position and check your posture every 30-40 minutes. Build it into your schedule. This could even be a walk to make a drink or go to the toilet!
Whilst sat at your desk use shoulder shrugs, shoulder rolls and gentle release exercises to release tension.
Stretch at the end of every day and during the day if you can. A decent hamstring stretch will really make your body feel much better. Combine it with a CAT and your lower back will love you.
The fitness world is evolving at a fast pace. There constantly seems to be another new fitness concept out or a new fusion franchise. Keeping up with all the new concepts is impossible. Some of them seem inspired and some incredulous!
I’ve often joked in classes that to make my millions I should start up my own fusion of some variation on Pilates:
Tropical Pilates – because I actually like the humidity and our studio often gets pretty warm.
Winolates – Pilates with a glass of wine, it could be a winner.
Barefoot Step – I’ve started teaching barefoot and love it (though I wouldn’t advise you do this until you are used to being barefoot and have built up to it).
Do you know the reasons I wouldn’t create my own fusion franchise right now?
1. I don’t have the time, if our studio is this busy teaching pure Pilates then something is working.
2. I believe in the pure form of Pilates too much. Joesph Pilates knew his stuff.
3. I’ve been around a bit in the fitness world. I’ve see fads come and go and throughout I’ve stuck to my guns as a freestyle instructor in aerobics, step and Pilates. Being free and able to adapt the class to suit their needs is key.
Yes I love adding in variations and using equipment to keep things fresh. Plus many fusion classes can be great, don’t get me wrong… But mixing 2 concepts together to create something new can also dilute things down. Something this can be great, not so for Pilates. I don’t want to dilute the effects of Pilates.
I also don’t want to be tied into teaching a certain way, using specific music, following a preset class or using a brands style. I love to learn from as many places as I can and am continually updating my repetoire and watching others teach so that I can bring new approaches, new descriptions, new variations and new thought processes to my classes. It’s not about 1 concept for me, it’s about translating Pilates to the people I teach in a way that helps them.
Teach the body you have in front of you in the best way you know how.
Press ups. I mention them in class and people groan. I hear you. In fact I used to groan too. That was until I learnt how to do one correctly and felt the benefit of being able to do them. Using your bodyweight as resistance is an awesome way of gaining strength and challenging yourself. I’ll admit it, press ups are not easy. If you can’t do a full on press up then there are lots of options that will help you work your way up. So let’s break them down and work out how to do them properly.
Press Up Positives:
A great upper body workout . Strengthens pectorals major, anterior deltoids and triceps. That’s chest, shoulders and upper arms. So if you want to tone up your “bingo wings” and sculpt your chest and shoulders these are the bee knees.
Builds bone density. The weight goes through your wrists and forearms helping to build stronger bones. This has huge benefits for later in life. When you fall, you put out a hand to stop yourself, so a strong wrist is essential.
Gets your heart rate up. Some people aren’t a fan as you feel a bit out of breath and flushed after press ups. But that’s one of the benefits, you are increasing your metabolic rate and burning more calories.
Core strength. When done correctly with the spine in neutral a press up works your core, if it doesn’t you are doing it wrong, see my tips below.
Press Ups Problems:
Some of the top issues I see are:
1. Saggy back. Your spine needs to remain in neutral. No saggy lower back is allowed, it can be damaging and is not using the core properly. Keep your range smaller and go down a level to build your strength first.
2. Arm position. When doing a tricep press up your arms need to be narrow, shoulder distance apart and your weight right forward over your wrists. This will lead to your elbows bending under you and not out to the side. Often people do not have their weight far enough forward, it needs to be as far forward as you can take it.
3. Neck dipping. Your spine and body need to move in one unit. In an effort to get down lower some people dip their head and neck down. I totally understand why but you are straining the neck flexors and will just end up with neck pain, so make it smaller 😉
4. Breathe. The sheer effort of these can mean you forget to breathe. I wouldn’t advise that 😉 You should breath out as you push up from the floor, the hardest part of the press up.
5. Bums ahoy. The bum in the air look is not an attractive one 😉 It means your weight is not shifted far enough forward. Check it out.
Building up to a Press Up:
You don’t have to go right in and do a full press up… perfect the technique and work up to it.
1. Wall Narrow Press Ups – stand facing a wall, arms shoulder height and shoulder width. Take a large step backwards and stay on your toes, weight over your shoulders and wrists. Think about your alignment, slide the shoulders down in the back, find your neutral and engage the core. Inhale as you bend the elbows and lower yourself towards the wall, keeping in neutral and not letting the neck or lower back dip. Exhale as you press up.
2. Half Press Ups on your Knees – come down to the mat and progress to half press ups. Start in hands and knees to find neutral spine and engage your core. Then walk your hands out about 1 hands distance further forward, still shoulder width apart. Shift your weight forward so you feel the weight through your wrists. Now try out that press up just going half way down.
3. Full Press Ups – when you feel confident with a half press up and can do 8 well, then move up to the next level. Keep your full press ups small to start with and keep checking your technique. Use a mirror to check your alignment, no lower back sagging, no bum in the air and no neck dipping. Ensure you are working through your triceps, going too far too soon can mean you end up collapsing and using every other muscle possible to get back up! Less is often more.
I’ve fast becoming a bit of a glut fan. If you don’t what I’m talking about then you probably are not in one of my classes, as I talk about these a lot. The gluts are the bum muscles, pretty big global muscles which if they are not functioning properly can lead to a lot of problems. There are 3 gluteal muscle: Gluteus Maximum, Gluteus Medius and Gluteus Minimus. Pretty good names 😉
As you can probably guess, Gluteus Maximum is the biggest of the 3 and it’s one of the strongest muscles in the body, well it is meant to be. When you think of the bum muscles, it is usually this one you have in mind. It works to extend the hip, so you can move your leg backwards and out to the side. It also rotates the hip and extends the trunk.
Gluteus Medius runs higher up towards the pelvis and out towards the side of the thigh. It helps extend the leg sideways and rotates it in and out. Glutus Minimus is the smallest of the 3 and it works with Gluteus Medius.
2. Have an abnormal walking gait and not optimal balance.
3. Struggle getting up from seated or from a squatting position.
4. Have lower back pain.
How can these muscles become weak? It’s often from postural issues and day to day activites. Sitting is a primary problem. You are not using your gluts when seated and your hip flexors become tight which stops the gluts from working. Other reasons can be having too strong quads from training and lordosis – a curve in the lower back which can lead to the bum sticking out. Common in pregnancy.
Top Exercises to help:
1. Squats done correctly. Try using a ball between your back and the wall.
2. Shoulder Bridge, add a knee fold in if you are strong enough. Make sure you tilt the pelvis and then squeeze the gluts so you are not just using your lower back.
3. Oyster/Clam. This works Gluteus Medius. Add a leg extension in if you are ready for the next level.
4. Plies. Squeeze in your bum and thighs as you come up to the top of the move.
5. Lying glut extension. Lie on your tummy, engage the core, let the pelvis drop into the mat and you should feel the gluts engage. Lengthen the legs and lift them off the ground, one at a time. You should be squeezing in the gluts as you lift and not feeling a pull in the lower back.
There are so many variations on all of these exercises, make sure you can master the technique and feel the gluts working properly before adding in too much fancy stuff 😉
Using Pilates small equipment can add variety and an extra challenge to your workouts. Here I use the Pilates soft ball and some weighted balls. However you can do the whole thing with no equipment, or use hand weights to replace the weighted balls.
The soft Pilates ball is only half inflated and you place it under your sacrum/SI joint (big bony part at the base of your spine). You could use a foam roller in it’s place or just come to the mat.
If you want to buy any of the equipment featured we sell it all through the studio 🙂
Please like the video on You tube and subscribe to the channel to get more!
Do you get pain when you lift your arm to the side? Or pain when rotating the arm so the palm faces to the ceiling? How about pain when taking the arm behind your back. If so you may have a rotator cuff issue. The great news is Pilates can help 🙂
The rotator cuff comprises of 4 muscles that go from the scapula to the humerus. These 4 muscles are the subscapularis, the supraspinatus, the infraspinatus and the teres minor.
The muscles work to lift the arm out to the side (abduct) and to stabilise the humeral head when the arm is abducted. They also have a role in keeping the head of the humerus in the correct position so prevent your shoulders from rounding. So if you have rounded shoulders your rotator cuff probably needs strengthening!
Movements that involve the rotator cuff muscles are brushing the back of your hair, back handed racket sports, overarm throwing and reaching behind ie, into your back pocket, or in my case I’m often reaching behind into a child’s car seat to pass something, or pick something off the car floor!
How to help rotator cuff issues:
Work in a pain free range – make your movements smaller so it does not hurt! Pain is a signal from the body that you need to stop and continuing can make it worse.
Quality of movement – think about how your shoulder blade is working. How does it feel, sound and look. Get it checked out by your GP, physio or Pilates instructor if you are not sure.
Slow down the speed of exercises to get the movements right and stay connected so you are thinking about the movement the whole time.
Exercises to strengthen:
Dumb waiter:
Start with the elbows close to your side, palms up to the ceiling, core engaged, good alignment.As you breath out, open the arms to the side, they may go to a right angle (mine don’t!), keep the elbows close to the body and keep the shoulder blades down in the back.
Floating arms to side:
Start in a neutral alignment, shoulder blades down in the back, core engaged, palms face in.As you breath out lift the arm with it passing out to the side of your body, coming in an arc to the ceiling. Keep the shoulder blade in position the whole time.Your end position. Now breath in and lower the arm back down.
Single chicken wing:
Start with the arm lifted to ceiling, shoulder blade down in the back. As you breath out bend the elbow letting the shoulder blade slide down in your back. Breath in to return to the start.
Oh my goodness it’s been an exciting week – and it’s only Tuesday! Yesterday we opened the studio doors for the first time. Cue squeals, jumping for joy and a victory dance from Priya. James was a little more reserved, thank goodness as that evens us out 😉
The feedback so far has been excellent. Comments include finding the new studio very peaceful, relaxing, how nice the floor feels, liking the beams and loving the fairy lights! The new mirrors may seem a little daunting at first but you really will get used to them and they will help you. Already in one class Lucy commented on how she could whether she was sitting up straight enough or not.
The first class in full swing.
Personally I felt that I was teaching in someone else’s studio, it is all so amazing that I can’t believe this space is ours.
Love, love, love the fairy lights.
We will now be holding the majority of classes in the Barn Studio. A few will continue to be in the home studio – these include Post-natal and the Wed 6.15pm. All classes in the Barn Studio will accommodate 8 people and we are putting on new classes:
Thurs 11am Pilates
Sun 9.15am Pilates
Wed 10am Toddler ballet (from 18 months to preschool)
Wed 3.45pm Pre- Primary Ballet (reception and year 1)
Please bear with us as we put on the finishing touches and do give us your feedback. This space is for YOU. So WELCOME!
WELCOME TO THE BARN STUDIO
MASSIVE THANKS to ANDY who did all the hard work on this project and was amazing throughout.
Squats Rock. Period. One of the best exercises if you are pregnant or postnatal. They strengthen your legs, bum, thighs, work your pelvic floor and your core. Just to add in a bit extra I’ve used a resisitance band to work the upper back too. A fabulous all-rounder of an exercise.
If you aren’t pregnant/postnatal this is ALSO a fabulous exercise. Try it out and let me know how you find it.
Lower back pain is one of the top reasons people come to us. It is such a common complaint that I almost expect people to mention it and tend to ask if it is not mentioned on our induction form.
The top 3 reasons I see lower back pain:
1. Being too sedentary and sitting down too long each day.
2. Carrying small children and incorrect lifting techniques.
4. An injury or fall.
We therefore often get messages from people saying their back is playing up, they feel like they have overused it or it is aching – so they will give Pilates a miss. Which almost makes sense. Almost.
Here are my thoughts on what to do if your back is aching. Think through what you have been doing and see if you can find the cause of the pain. Have you been sitting for longer than usual, for example on a long car journey? Have you been decorating, gardening or lifting heavy objects? Have you been doing a different form of activity? Did you sleep on a different bed or in an unusual position? If the answer is yes then the pain is likely to be muscular and Pilates can actually help. Strengthening your core will help prevent further damage to your back plus mobilising the spine can help stretch it out and release tight muscles.
To help muscular back aches:
1. Keep mobilising and moving it. Sitting or lying still for too long will cause it to stiffen up.
2. Take some painkillers.
3. Come to Pilates but work at a lower level and one that does not cause you pain, make sure you tell your instructor wat has happened.
4. Soak in a hot bath.
5. See your GP/Physio if it gets worse.
Contact Us
To book onto a class or for massage please contact Priya (best by text/email).


